Friday 30 September 2016

Contextual Studies lesson 2

During today's Contextual Studies class, we discussed the concept of Avant Garde and its impact on influencing forms of media, such as Films and Music.
We also learnt that the origin of Avant Garde derived from German Expressionism films due to the usage of disfigured and warped sets and the harsh and stern use of colour severity. Along with this, we watched severeal short clips from films that's challenged the use of Avant Garde, such as "The Bicycle Thief" along with the Judo scene from "The Matrix" that experimented with idea of speed and sound portraying a faster notion that in realityWe later looked at numerous definitions for the words:
  • Utopia
  • Dystopia
  • Avant Garde
An interesting source I found for describing definitions of Utopia and Dystopia came from John Miltons "Paradise Lost":“The mind is its own place, and in itself can make a heaven of hell, a hell of heaven..”I think that this is an interesting quote from an authentic source because it initiates the idea of a Utopia and a Dystopia to be enjoyed at ones own will rather than simply relying on elements in the atmosphere.

Our group later each chose films that we felt personally associated with the idea of Utopia and Dystopia:

I chose "The Great Gatsby" - The idea of 1920s New York being a paradise compared with Nick's perception of New York in the end to be "haunted"

Rachel chose "Animal farm" - The idea of uprising against an unfit dystopia placed upon them

Ria chose "Mad Max"- The idea of creating havoc

Laura chose "A Clockwork Orange" - The idea of youth being programmed to detest violence

Adobe Animator workshop 2 - Timing & Spacing part II

This is an example of a good animation
For the second part of our lesson we were required to make an animation of a pendulum to test our ability to work with balance along with test to see whether e could rotate an animator around a point.

I found this exercise surprisingly easier than our first one because it involved basing the strength of our animating around whether we could align everything correctly.

Adobe Animator workshop 2 - Timing & Spacing


For todays lesson of Adobe Animator, we learned how to animate two circles using 25 frames. We were required to plan different movement paths for our 2 circles and customize them as we wish, as long as they both had the same starting and finishing position. Due to wanting to show more of a difference between the two circles, I tried to colour the second one with gradient colours to emphasize the different speeds of its movement compared with the first circle.

At first it was challenging to create distinct differences in both the circles movements due to trying to get them to both flow abundantly but still give them different speeds. With this, I managed to speed up the movement of the second circle at the start at finish the slow down its movement in the midpoint of the animation. I think this makes a good contrast to the first circle that flows in a simple way and has even movements.

Thursday 29 September 2016

Life Drawing session 2

Our second life drawing session involved sketching more drawings in a more limited amount of time in order to improve our time management when drawing. Our session also revolved around determining different light and dark sources by dimming the lights in the room and using a portable heater to reflect light on the life model.

I tried to outline and highlight the light sources and shade in the shadows displayed with a mixture of pencil and charcoal. I also tried to use a wider range of drawing materials for this session to add more variety to my work. A drawing material that I hadn't used yet in our life drawing sessions was a fine liner pen, in which I used to complete sketches of the remaining poses that our model did. Although I had done life drawings using a fine liner pen before, I found the task of using it to be harder than I anticipated because it had a thinner nib than I was used to, which meant that I had to make my sketches more rough and less precise.


Tuesday 27 September 2016

Maya Wine Glass tutorial/ Egg cup tutorial with Simon Holland

For Maya Monday, we were required to create a wine glass object, along with several other objects that were similar to alcohol bottles and glasses using NURBS.  We then later learned how to create an extrude within our created wine glasses in order to make our objects look more realistic. It was interesting to learn the different shortcuts and keys in Maya and it was also interesting to learn how to manage the difficult tasks involved with modelling objects and forms.

1
At first I found it challenging to keep my created objects intact due to struggling with the different perspectives with the nerve tools, but through using a different technique, I managed to create models from previously created templates which became much easier to understand. One of the problems included accidentally creating holes in my first wine glass made due to rendering it in the wrong viewing panel, but with this in mind, I managed to later have another go at recreating and correctly rendering other objects later on with help from Alan Postings.


1st Maya class session with Simon Holland
After our first real modelling session with Maya in class, I wanted to try and redo some of the activities that we did in class to see whether my skills with using the program would improve with practice. Through following the first initial Maya tutorial on the Computer Animation Arts 1st year blog for Maya tutorials, I managed to vastly improve my knowledge of Maya along with gain a higher level of confidence in which to use the program correctly.


Maya practice from home 
Maya practice from home


Numerous Thumbnails Digital and Hand drawn for invisible cities

Fedora

Esmerelda
Octavia
Fedora
Agria
Diomira

Maya Wine Glass tutorial/ Egg cup tutorial with Simon Holland


Photoshop planning techniques for Invisible Cities

In our photoshop class we learnt learned about the importance of planning in terms of creating digital artworks for our chosen cities. We watched a series of short films and animations that portrayed the approaches of using techniques such as:
  • Value perspective and tonal range
  • Balance and stability
  • Symmetry
  • Composition and framing
  • Points of interest using rule of thirds 
  • Leading lines

Our task was to first to create a note page based on our task to create more thumbnails for one chosen city. The city that I chose to use was Anastasia, as due to still being unsure of my final chosen city, I wanted to see whether the city of Anastasia would allow me to come up with more ideas and variety than the other cities available.

Anastasia city description
Visual Library research page


Drawings based around the concrete description of Anastasia 


Thumbnails based on the environment 


We first had to create a word stack, which meant that we had to write down the initial key words that provided key details about the city. We then had to find imagery as a source for hand drawing and digitally drawing our thumbnails to create a visual library, along with create a selection of digital thumbnails as a form of practice.


1st Character Design workshop


First set of sketches
For our very first character design workshop, we were required to imagine that we were concept artists who were working for Pixar in producing background monsters in the movie "Monsters University". We were each given a selection of different numbers based on describing the characteristics of the monsters that we were to create. My selection of numbers given determined that my monster would have two arms, two legs, five eyes and would have the persona of a Beatnik/Artist.  We were also encouraged to work with the idea that we had to make a variety of quick sketches and contrasting ideas as if we were giving a client a quick selection of choice and variety.

Using these given requirements, I tried to give my creations more over exaggerated features to portray the fact that they were monsters even though they had moderately human forms. I also used inspiration for their appearance from those such as Audrey Hepburn who embraced the Beatnik style back in the 1950's and I also tried to use influences from French Mimes along with include heavy influences of black and white colours.
Adobe Illustrator outlines

Final Monster Chosen

Friday 23 September 2016

Film review of Robert Wiene's "Das Cabinet des Dr. Calgari" (word count 1677)

Robert Wiene’s Das Cabinet des Dr. Caligari (1920) is a German silent horror film that is significant for being representative of early German Expressionist cinema. In addition to being renowned for its eerie and bold set and character designs, much of its worldwide success comes down to its production design being a strong narrative of the plot.

Caligari has become particularly influential to Directors such as Tim Burton; with this being seen through Burton’s films Edward Scissorhands, Corpse Bride and Dark Shadows. Burton’s character design of Barnabas Collins in Dark Shadows bears a striking resemblance to Wiene’s Cesare in Caligari; with both characters depicting over exaggeratedly dark under eyes, ghostly pale skin, tight black clothing and askew jet black hair. This could be due to both characters’ being notorious for being arcane and macabre and inflicting death upon others. Along with this, there are reoccurring twisted and angular sets in both Caligari’s and Corpse Bride’s town which could also be an indication of decay and death being evident in both 
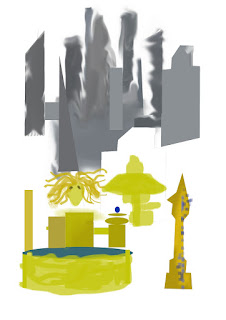
atmospheres. The production design of the city of Holstenwall – “The small town where I (Francis) was born” in Caligari also creates an angst through the conflict of it being both physically engaging but also being unearthly. Similar to the design of the city of Metropolis in Fritz Lang’s Metropolis (1927), it inspires the idea that the city is deteriorating more and more as its inhabitants are suffering due to the narrowing and illogically jarring buildings and structures.

Cesare’s coffin like inhabitance induces the idea that he takes up a supernatural form – almost that of Dracula or Frankenstein, and denotes an idea that he is to be treated like something inhuman even though he is a normal human being who “Has slept for twenty- three years”.  The house in which Dr. Caligari resides is also somewhat irregular as it is extremely small and isolated from the rest of the town, and has a noticeable crooked window and door. This portrays it not as a homely house, but a ominous residence for Dr. Caligari to to prepare his deadly tasks. The character of Jane represents the character-type of the damsel in distress, especially through her being a target for a murderer which whom Francis has to defeat in order to save her. It is also interesting how out of the entire set of the movie; her bedroom is the only set that is plain white. This adds emphasis on her innocence and pureness for being the only main woman of the film, and the fact that her room is quite regal and delicate also demonstrates that she is of a high status and that she needs to be protected.

One of the more dramatic moments in Caligari that demonstrate Cesare’s attempt to murder and then instead kidnap the character of Jane portray a wide range of significant examples of production. One of the significant sets used is one singular long wall, in which inhibits a barrier-like purpose. It is used by Cesare in which to hide him en route kidnapping Jane, yet ironically, it is meant to be used as a protective device Jane for where she lives.
The numerous staircases that are used are more or less all black and white, yet they each have different patterns and styles that seem irregular and very untraditional. The numerous patterns include intersecting triangles and singular continuous long black lines, along with ranges of other spontaneous patterns, however, their purpose could be to imply that there are peculiar happenings in the buildings that they are in, but could also be decorated as a warning to those willing to use them that the paths that they would need to undertake are not always predictable and plain. One of the more dramatic uses of staircases is used when Cesare takes Jane to the top of one of the buildings as a threat, portraying him to have an exemplified twisted and unmerciful character type. There is also the highly acclaimed bridge that is used by most of the main characters which perfectly illustrates the alarming levels of impracticality and threat through the wild and untamed vines, and the fact that it is viewed full on from the front reflects the impact of a lack of escape and a need to overcome obstacles in order to escape.

Other expressive forms of production design in Caligari include the single chair in Francis’s that has multiple tops of back frames piled onto one another, which could entail the yet to come heightening and build up of the plot, along with mould to Francis’s ability to work out a puzzle. Another significant prop that is used is the giant book and the giant pedestal that are being used by the Clerk in his office. An obvious assumption would be that this is to add power and elaborateness along with present a strong set of rules and history that the town of Holstenwall is run in a proper and professional manner. The larger sizes of props could also be to demean the character of Caligari to seem unworthy enough to speak with the Clerk, making us as an audience feel sorry for him. They could also be to show that by denying a seemingly harmless character a chance to speak, that choice could be later regretted once they get their revenge.

The great twist at the end of Caligari where there is a possibility that the character of Francis is an unreliable narrator and that Dr. Caligari is in fact innocent sparks concern in the audience’s judgement in good and evil. Ironically, this scene takes place in a mental asylum – a place which is meant to categorise the mentally sane from the insane and declare those that need mental help, in which case it seems to be Francis: “You all think I'm insane-! it isn't true - it's the director who's insane! - He is Caligari... Caligari... Caligari!”. It also appears highly legitimate that Francis discovers Dr. Caligari’s criminal past in a genuine and highly acclaimed room of authority and truth.

What is also interesting about this ending is that both Dr. Caligari and Francis’s appearances change in terms of the way their sanity is projected. In the majority of Caligari, Dr. Caligari’s character consisted of having scraped back white hair under a tophat and thick glasses. The scraped back hair under a hat provokes the idea that he has something to hide, and the overemphasize glasses frames infers a heavy and bold impact on his perception of vision. Caligari portrays a roughly similar ending to Martin Scorseses’ Shutter Island (2010), as it also reverses the roles of the mental patient and the Doctors.

During the first couple of scenes of Caligari, we as an audience are unsure of the immediate plot of the movie. The starting scene involves a young man (who we later know to be the
character of Francis) seated on a bench with his unnamed friend and they discuss the concept of the supernatural and its impact on life and death, comparing one another’s contrasting experiences. Francis’s friend explains that he had been driven from his home and family by spirits so he has a more negative outlook, yet Francis exclaims that “What (my betrothed) and I have experienced is yet more remarkable than the story you have told me…”. This statement infers Francis’s affairs with spirits to be more thought provoking and extraordinary, which introduces the idea of its involvement in the film to be an experience to reflect upon, encouraging further interest and engagement from audiences. The production design later shows the impact of the supernatural in Caligari when there are shadows and streaks of light painted directly onto the set when the series of murders have occurred. This derives that the impact of spirits is so strong that it literally scars the atmosphere and its inhabitants. During the early stages of the film, we see Francis’s interest in the supernatural to be evident when he volunteers his friend Allan to ask the somnambulist when he will die. Even when the somnambulist states that Allan’s death will happen “Before the break of dawn”, and a series of murders have occurred long after, he still chances an interest. This inflicts the idea of Francis deteriorating into madness at the end of Caligari to be derived from his interaction with the somnambulist.

Unlike most silent films, the intertitles of Caligari change depending on the mood of the scenes and plot. They are also stylized in a variety of ways depending on the emotion of the dialogue said by the characters. For example, the titles and intertitles are green to start off the movie, portraying an exciting. They exceedingly correspond with the different filters of the later scenes, such as the intertitles using brown tones during the scenes that revolve around the fairground and the black tones used during the scenes that occur within the city of Holstenwall. The brown tones reflect the welcoming and down to earth atmosphere of a social environment, along with provide a sense of security which initiates the audience to feel at ease with the situation. However, it is not very spontaneous, which adds shock to the audience later when the Somnambulist is introduced and completely changes the tone of the movie.


At the very end of Caligari, we return to the rest of the opening scene in which we view Francis and his friend with more versatile and experienced character types. We also learn of the diversity of people’s perceptions of the paranormal and that their experiences happen for either enlightenment or to engage in complex thought. As Thomas Hobbes quoted: All generous minds have a horror of what are commonly called 'Facts'. They are the brute beasts of the intellectual domain”, this links to the  consideration that the hard truth of Francis’s experience with the supernatural was to view someone’s abuse and exploitment of it, but yet it could have also been a chance to build character and to create justice for those who have been wronged through it.

Created GIF of 1st Adobe Animator workshop with Nat Urwin


For our first Adobe Animator workshop, we were required to create an animation of 50 frames that gradually transitioned from our own face into a food of our choice, then into an object. It was my very first time using Adobe Animator, and at first I found the task to be quite challenging because I found it confusing on hot to transition between frames fluently, and I also struggled with trying to make quick sets of frames instead of taking my time to make each of them look good on their own. Overall I am satisfied with what I have produced as since it was my first time using Adobe Animator I allowed myself to make mistakes in order to reflect on my skills and find greater ways to improve.

Your Face by Bill Plimpton 1987 - Video

     
Your Face by Bill Plympton from Daniel on Vimeo.

This video linked with the work that we were required to produce in Adobe Animate

Wednesday 21 September 2016

Life Drawing work from the Foundation Diploma at UCA Rochester


I wanted to post this with regard to seeing the differences between my skills from last year in comparison with this year.

1st Life Drawing Lesson

Exercise 1


Exercise 2

Exercise 3
For our first life drawing lesson, we worked on experimenting with drawing at different sizes and scales, along with drawing with different materials such as charcoal and pencils.

Exercise 1 was to simply demonstrate our drawing skills
Exercise 2 was to demonstrate our ability to produce multiple drawings using a range of materials in limited time
Exercise 3 was to create a drawing that displayed detail and light and dark sources

I wanted to create a realistic set of drawings that displayed a good understanding of light and dark sources detail and precision. I also wanted to produce work using the technique of line drawing in relation to Artist Gosia Wlodarczak. Overall I am happy with the work that I produced because it shows a variety of skills. If I were to improve any of my pieces I would try to work with using less severe outlines so I could try and improve my perception of shape.


Monday 19 September 2016

1st Autodesk Maya Tutorial with Simon Holland

In the afternoon, we had our first Maya tutorial with Simon Holland. The session was based around learning the basics of the Maya software that we will be using over the next three years, along with understanding the terminology of the techniques.


Saturday 10 September 2016

Sketches 71 - 101


For my final set of images, I tried to experiment with warping shapes more spontaneously to add to the already given set of objects. I also tried to use different colours to test their impact on my designs. Overall I am satisfied with this set of images as they all look significant toward one another.

Sketches 46 - 70


With this set of sketches, I tried to create a selection of structures by using less detail and making the structures more distinct. I also tried to use elements within my work such as feathers and chains to give my drawings more character. I think that the work that I have produced in pencil looks more intricate due to the different tones and details shown

Sketches 13 - 24


With the second set of sketches, I tried to use a slightly less practical approach when creating them. Along with using influences from plants and wildlife for lifeforms, I wanted to use influences from technology to test how well I could blend our given objects with more contrasting ideas. Overall, I like the fact that the different colours I used balance out the different viewpoints, but if I were to improve it I would try to embellish my drawings more by adding more small details to them.

Sketches 25 - 45


I think that this set of sketches looks the most original out of the other ones that I created. This is due to the fact that I didn't try to use any other sources for inspiration. In the end I tried to combine different elements of our given objects together to try and work on simply using my imagination. Overall, I unfortunately think that this is my weakest set of sketches due to the fact that I think you can't tell whether most of the sketches are life forms, structures or machines. I would want to improve these sketches by being more selective and conscientious on what elements of the objects to combine with one another, as I think that approach would enable the final designs to look more valid.

Sketches 1 - 12


For the first set of sketches for the Summer Project, I wanted to draw a more elaborate set of sketches to demonstrate my skills to my Course Leader, Phil Gomm. I tried to use various drawing materials to complete them because I wanted to step out of my comfort zone and test whether I could display the same skills using different materials. I can honestly say that I am happiest with this set of sketches out of the 101, because I think they are of a higher quality than the others When I first attempted drawing I found it easier to sketch life forms. I think that using the influence of life forms is easier because when exploring that subject, there is a distinct range of examples to use such as animals, plants etc.

3 Final Designs


Life forms Front
Life forms Back
Life forms Side 

This is the first of the three final designs to conclude the Summer Project. It is a life form of an Octopus and I took inspiration from the round vase-like object. Overall, I am very pleased with the result as I like the variations in the different tones and details. I am also happy with the over exaggerated features as they make the design more complex. I am also satisfied with the fact that the design is able to look like an exact life form - which is the octopus.


Structure Side, Front & Back
Machine Side, Front & Back